
2. USB memory stick (2 GB recommended - 1 GB minimum)
3. A motherboard that is capable of booting from a USB drive (check your motherboard manual if not sure)
As long as you have all three points above met, then you are ready to start. Just so you know, in this process your USB flash drive will be formatted, so do not use a USB that contains data vital to you. As for a motherboard that is capable of booting from a USB drive, most modern motherboards offer this as a standard feature. If your motherboard is less than two years old, chances are that the motherboard you have supports this feature.
Okay, now we have made sure that your computer is capable of installing XP from a USB disk. The next thing we need to do is to download and extract three tools that are going to help us in this procedure. You can find download links to these files below:
1. USB_Prep8
2. PEtoUSB
3. Bootsect
Download Link:
I suggest you download these files directly to the root of your hard drive. In other words save them to a folder on the same drive that contains your operating system — for most people this will be the C: drive. Once they are all downloaded, go ahead and extract PEtoUSB and USB_Prep8 to separate folders. Once this is done you should take the contents of the PEtoUSB folder and copy them into the USB_Prep8 folder. Once this is done, you should go back to the root of your drive and extract Bootsect to the root of the drive (program files and Windows folder is stored in this area). We do not need to worry about the Bootsect program for now, however that is simply preparation for later. And as another matter of preparation I suggest you insert your Windows XP CD, create a folder on the root of your drive, name it XP, and then copy the contents of your Windows XP CD into that folder as you will need these files soon.

Okay, now that all the preparation is out of the way, we’ll start the process. It will take on average about 20-25 minutes to complete this process depending, of course, on the speed of your PC and of the USB stick you are going to be using. I must warn you now that you should NOT close any of the windows generated by the programs I am showing you how to use until you reach the point in this guide when I tell you to do so. This is quite important because, if you happen to close any of the following windows, it is possible that you can screw up the procedure and you will have to start again. With that out of the way, as long as you follow the instructions below, everything will run smoothly.
1. Go into the folder named USB_Prep8 and double-click the following: (usb_prep8.cmd)


12. Providing you closed all the right windows, the USB_Prep8 Window will now contain seven options
I suggest you download these files directly to the root of your hard drive. In other words save them to a folder on the same drive that contains your operating system — for most people this will be the C: drive. Once they are all downloaded, go ahead and extract PEtoUSB and USB_Prep8 to separate folders. Once this is done you should take the contents of the PEtoUSB folder and copy them into the USB_Prep8 folder. Once this is done, you should go back to the root of your drive and extract Bootsect to the root of the drive (program files and Windows folder is stored in this area). We do not need to worry about the Bootsect program for now, however that is simply preparation for later. And as another matter of preparation I suggest you insert your Windows XP CD, create a folder on the root of your drive, name it XP, and then copy the contents of your Windows XP CD into that folder as you will need these files soon.

Okay, now that all the preparation is out of the way, we’ll start the process. It will take on average about 20-25 minutes to complete this process depending, of course, on the speed of your PC and of the USB stick you are going to be using. I must warn you now that you should NOT close any of the windows generated by the programs I am showing you how to use until you reach the point in this guide when I tell you to do so. This is quite important because, if you happen to close any of the following windows, it is possible that you can screw up the procedure and you will have to start again. With that out of the way, as long as you follow the instructions below, everything will run smoothly.
1. Go into the folder named USB_Prep8 and double-click the following: (usb_prep8.cmd)

2. Make sure you select the newly created command prompt window and click any key to continue
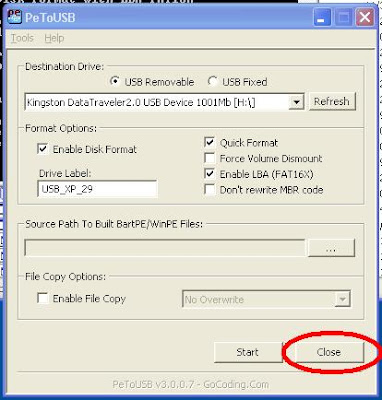
3. A new program is started (PeToUSB). Do not change any of the settings; just click start and let it run
3. A new program is started (PeToUSB). Do not change any of the settings; just click start and let it run


4. Once PeToUSB is finished, DO NOT CLOSE any of the windows the program created


5. Go to your start menu and click run if you’re using the classic start menu
6. Enter the following command into your run window: (CMD)]
7. Once you have run that command, a new window will appear with the words command prompt
8. Provided that you have used the file setup I suggested, input the following: ( cd \bootsect )
6. Enter the following command into your run window: (CMD)]
7. Once you have run that command, a new window will appear with the words command prompt
8. Provided that you have used the file setup I suggested, input the following: ( cd \bootsect )

9. Type in the following: ( bootsect /nt52 H: ) Replace H with the drive letter of your USB drive
10. You will see the message (Bootcode was successfully updated on targeted volume) if it worked right
11. You may NOW close all the windows except for the window that was created when you ran USB_Prep8
10. You will see the message (Bootcode was successfully updated on targeted volume) if it worked right
11. You may NOW close all the windows except for the window that was created when you ran USB_Prep8


13. Press 1 on your keyboard — this will bring up a window. Locate your XP folder and highlight it. Click OK

14. Press 2 on your keyboard — the program will ask for a unused drive letter (example: T or Z)

15. Press 3 on your keyboard — the program will ask for your USB Stick drive letter; enter it now.


16. Press 4 on your keyboard to start the USB_Prep8 process

17. The program will ask you if it is OK to format a drive contained in the letter you gave in #14; click yes

18. The program will start to copy the needed files; be patient
19. The program will then ask you if you wish to copy these files to the USB stick; click yes.
19. The program will then ask you if you wish to copy these files to the USB stick; click yes.


20. Finally, once it has finished copying the files, it will ask you if you want to make the stick the preferred boot drive. Click yes, after which it will ask if you wish to un-mount the USB stick. Click yes
And that’s all there is to it. The USB flash drive is now ready to install XP to any hardware that is supported by the Windows XP CD. However there are some minor differences to installing Windows XP this way than if you would with an optical drive, which I am going to go into. Of course, as I have said before, the speed at which Windows XP installs is MUCH faster when installing using a USB stick than if you were using an optical drive (CD/DVD). But the speed comes at the price of you needing to pay a little more attention to the install itself. Now from this point on, I am going to assume that your motherboard does in fact support booting from USB and that you have gone into your BIOS and have set the USB flash drive as the first drive to be booted from (make sure the flash drive is connected before you turn power on — it helps). I cannot give a generic answer to where that option is in your BIOS; I suggest you look up in your motherboard’s documentation.

Repair and fresh install of window XP Click here http://adf.ly/2UbyY
Providing it boots from the USB flash drive, you will now be shown two options. One with the words GUI and one with the words Text Mode. Choose the Text Mode option first. Now you will see what you normally would see during a CD install of XP. Just follow the on-screen instructions as always. One note is that, if you need to create a new partition for your new Windows XP installation, once the partition is fully formatted, instantly turn off the PC as the install will need to be restarted so the flash drive can recognize the layout of your partitions correctly. Follow the instructions below:
1. Create a new partition and format it as normal
2. Once the partition is formatted, restart your PC and when the options come up again choose Text Mode
3. Highlight the newly formatted partition, press enter, move down to make no changes, and press enter
Okay, now after that all goes through and the PC restarts, simply chose the GUI option on the menu and let the Windows XP install go along as it would normally do. I must advise that you DO NOT REMOVE the USB stick until you’re actually past the setup stage. Once you have just booted into Windows XP for the first time, you can go ahead and remove the USB stick. Congratulations! You have just installed Windows XP without the need for a CD/DVD drive.
The benefits of installing from USB are plentiful and, providing you take the time to follow the instructions above, you need never worry about scratching your Windows XP CD again. I hope that the time I spent writing this guide will help you all to decrease the amount of time you spend having to install Windows XP .
See Other PC Laptop Repair Click here http://adf.ly/2SMhk


") United Arab Emirates
United Arab Emirates 


0 comments:
Post a Comment