WelcomeWelcomeWelcomeWelcome

1

Gyro Internet Games Shop

2

Gyro Internet Games Shop

3

Gyro Internet Games Shop

To Earn Money Thru Internet

Click the Euro Money to start your earning now,You dont have nothing to loose just try it

To Earn Money Thru Traffic Exchange

Click the Picture to start your earning now,You dont have nothing to loose just try it

4

Gyro Internet Games Shop

5

Gyro Internet Games Shop

6

Gyro Internet Games Shop

To Earn Money Thru Internet

Click the Dollar Money to start your earning now,You dont have nothing loose just try it

To Earn Money Thru Traffic Exchange

Click the Picture to start your earning now,You dont have nothing to loose just try it

7

Gyro Internet Games Shop

8

Gyro Internet Games Shop

9

Gyro Internet Games Shop

10

Gyro Internet Games Shop

Showing posts with label PC Laptop Repair. Show all posts

Sunday, July 21, 2013

PSU Testing Basics for Cool Techs


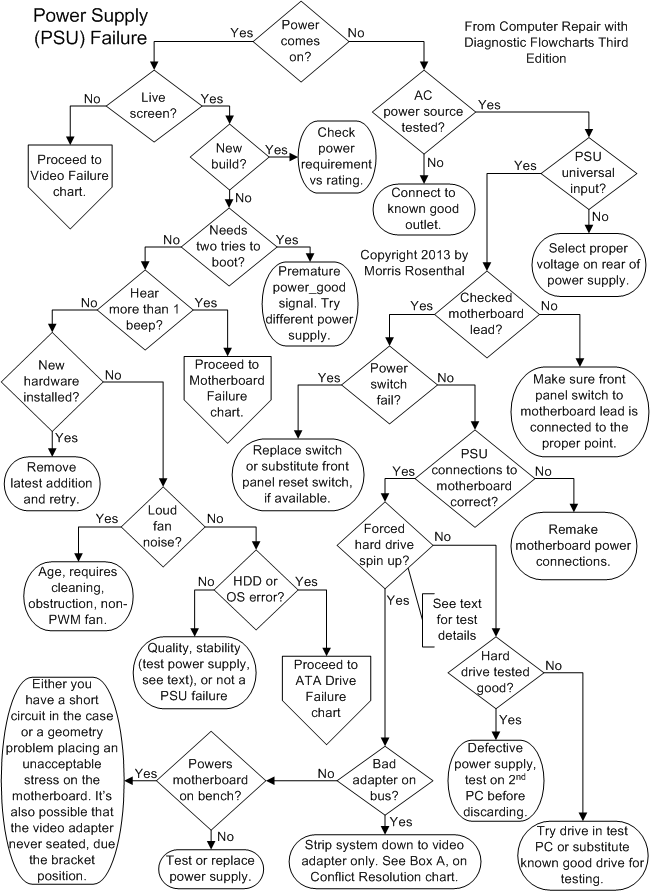
The computer just won’t boot up. Yes, the cord is plugged in, the PSU switch is on, and the red voltage switch on the back is set to the correct voltage. You’ve eliminated the possibility that the power switch on the machine failed as well. Now what? In this article we’ll walk through some basic troubleshooting steps when testing a PSU for failure. If at any point you determine that the issue is not the PSU, I’ve included a link to a handy flowchart for PSU Testing at the bottom that lays out some more complex steps involved that can help you narrow down the problem.

1. Before you get started testing any PSU, you should find out from the owner of the machine what led to this inoperable state. Is this a new build? If it has been in use for some time, was there an electrical surge? A lightning storm? Electrical work done on the house? Was new hardware or software installed recently? Were any objects inserted the wrong way into the machine ports such as USB drives or media cards, inserted into the wrong ports altogether, or were foreign objects involved? Was there any smoke when the machine failed to operate, or any burning smell? These are important indicators that can save a lot of troubleshooting time.

2. If there were noises or smells reported by the client, I wouldn’t recommend trying to power up the machine with it in. It’s not worth damaging the machine over the cost of a new PSU. It would be better to use a PSU tester on it first, if you feel inclined to believe that the noises and smells were possibly coming from another source. If there were no noises or smells reported by the client, try booting the machine. Observe the PSU when attempting to power up the machine, and note any noises or smells coming from the unit. If you get odd noises such as sparking or bad electrical smoke smells, unplug it immediately, and replace the power supply with a unit matching the specifications of the original unit.

3. If the fan spins or the hard drive spins when you attempt to power the machine on, the problem may lie elsewhere. You might want to check for any of the ‘beeps’ that indicate issues such as memory problems or other issues. If the fan doesn’t spin, and there is no change in the state of the machine, continue troubleshooting.

3. Check all the PSU connectors in the machine. If any are loose, that could be an indicator of a problem other than the actual PSU components. You may want to disconnect all connectors and reconnect them to eliminate any doubt as to that possibility.

4. Many motherboards have a small LED, and if this is on when you have the PSU plugged in, the PSU is sending power to the board. If it’s off, you will need to continue troubleshooting. If it’s on, you may try disconnecting all the hardware connectors to the motherboard to determine if hardware may be causing a short in the machine. Sometimes media card readers can cause issues where a short will cause the PSU to behave as if it was failing. If you still can’t locate the issue, continue troubleshooting.

5. Use a PSU tester. Yes, you can use a voltmeter, but PSU testers are cheap, and they’ll save you a lot of time. You can also test a PSU by shorting out two of the pins, and while it seems like an easy check, it won’t tell you everything, and a PSU tester will also work towards demonstrating to the client that you have the tools for the job and don’t need to ask for paperclips to get it done. This step can often be done first to eliminate the possibility of a failed PSU, but if the PSU still fails to power the machine, you’re still at square one on troubleshooting.

6. If you have a spare PSU that meets the wattage and electrical specs of the original PSU, swap it out, and see if the machine boots. If you’re certain your PSU is operating correctly, and the machine still fails to boot up, this is an instant sign that something else is the problem, and you’ll need to continue troubleshooting other electrical problems or hardware problems.

Depending on the results you get from the tester, you may realize the PSU is bad and it needs to be replaced. Check to see if the PSU is under warranty, and if it is, contact the necessary party and arrange for replacement. If the PSU is under warranty, you should be aware that opening it may void the warranty, so resist the temptation to check out the inside of the PSU before checking for a warranty. You’ll also want to beware of electrical shock, as some components inside the PSU may store an electrical charge even after having been disconnected.

When replacing a PSU, make sure you ensure it provides enough wattage for the machine, and that the specs match the original PSU. Failing to do so will damage the machine. Also, be sure to have the PSU switched off when working inside the machine. A dropped screw or other metal object could land in just the wrong place, causing a short and potentially damaging the motherboard.

If you’ve determined that the power supply is not the problem, you’ll want to do some more troubleshooting along the lines of this chart, which goes into expanded troubleshooting beyond PSU testing in much more detail and in an easy flowchart method.


Tuesday, April 3, 2012

List of Downloadable Computer Repair CDs


Large List of Downloadable Computer Repair CDs


The list of CDs for various computer repair tasks. In this list, the following types of CD are available for download: Antivirus Boot CDs, Recovery Disks, Hardware Diagnostic Boot CDs, Network Testing/Monitoring, Data Recovery Boot CDs and Special Purpose CDs.


Some of these are free to download, some are not. Be sure to read the EULA for the CD’s you download and the applications you use to make sure you are allowed to use them in the manner you plan to use them in. Many of the CDs contain a variety of different programs and some of the applications are free to use as you please, but some of them disallow commercial use. So be sure to read and abide by the EULA for whatever you use.

Also, some of these CD’s may set off an antivirus false positive due to their virus removal, password cracking, system file changing nature. Konboot is one such CD that will set off antivirus software. Its best to scan the CDs that are setting off your antivirus using a site like Virustotal.com and make your own decisions.

Antivirus Boot Disks                                                                                
Avira AntiVir Rescue System                                                                http://adf.ly/6sQGn
BitDefender Rescue CD                                                                        http://adf.ly/6sQbB
Dr Web LIVE CD                                                                                http://adf.ly/6sQkk
Fsecure Live Cd                                                                                   http://adf.ly/6sQxR
Kaspersky Antivirus Live CD                                                               http://adf.ly/6sR6H
VBA32 VirusBlokAda (Russian)                                                          http://adf.ly/6sRC3
PcTools Alternate Operating System Scanner (AOSS)                         http://adf.ly/6sROA
Avast BART CD                                                                                 http://adf.ly/6sRZv
AVG Rescue CD                                                                                http://adf.ly/6sRlQ

General Purpose Recovery Disks
FREE UBCD4win Ultimate Boot CD for Windows                             http://adf.ly/6sU2f
FREE UBCD Ultimate Boot CD                                                         http://adf.ly/6sUUp
FREE Trinity Rescue CD
FREE System Rescue CD x86
FREE System Rescue CD (sun sparc)
FREE System Rescue CD (power PC/mac)
FREE Windows Vista Recovery Disk (32 bit/ Microsoft)
FREE Windows Vista Recovery Disk (64 bit / Microsoft)
FREE Windows 7 Recovery Disk (Microsoft)
FREE INSERT (inside security rescue toolkit)                                    http://adf.ly/6tXDF
FREE Microsoft ERD/DART 2009
FREE Bootzilla for Windows

Hardware Diagnostic Boot CD’s
FREE Inquisitor (hardware testing software)                                      http://adf.ly/6tXKl
FREE Inquisitor 64                                                                           http://adf.ly/6tXQT
FREE Microsoft Memory Diagnostic                                                http://adf.ly/6tXUK

Network Security Testing / Monitoring
FREE Network Security Toolkit                                                      http://adf.ly/6tXde
FREE BackTrack network penetration testing
FREE Knoppix STD (security tools distribution)                               http://adf.ly/6tXkR
FREE nUbuntu network penetration testing

Data Recovery Boot CD’s
FREE RIP (Recovery Is Possible)
Helix (computer forensics / electronic discovery / incident response)
Caine Computer Aided Investigative Environment                           http://adf.ly/6tY3g         
Macquisition CF forensics for macs
The Farmer’s Boot CD
Puppy Linux

Special Purpose Boot CD’s
KON-BOOT
FREE Samurai Web Application Testing                                        http://adf.ly/6tYP4
FREE Offline NT Password & Registry Editor                               http://adf.ly/6tYVP
FREE PC CMOS Cleaner                                                            http://adf.ly/6tYaq
FREE Parted Magic                                                                      http://adf.ly/706Pn
FREE Partition Wizard contrib IISJMAN                                      http://adf.ly/706j0
FREE Ping (backup / restore hd images across network)               http://adf.ly/706WS
FREE Incognito (completely anonymous web everything)              http://adf.ly/7072D

Other CD’s of Interest:
VistaPE                                                                                       http://adf.ly/7077c


Some CDs have been purposely left out of this list as they contain illegal software.
Creating Multiboot CDs

Many people have expressed an interest in creating a multi-boot CD or USB stick. SARDU (Shardana Antivirus Rescue Utility) is a program that creates multiboot cd’s and usb sticks. Basically you download the ISO’s of bootable cd’s you want from this list that are supported by SARDU, then you download SARDU. When you extract SARDU there is an empty folder called ISO’s and you put the iso’s you download into that folder. When you run SARDU, it will find all the ISO’s that you downloaded and stuck in the folder, and offer to build you a cd or usb stick.
You can download SARDU Here. Thanks to Thor and AtYourService for contributing information about SARDU.

Special thanks to PcTek9, Methical, AtYourService, IISJMAN7, rusty.Nells, Thor999, Hyfidel, Studiot, Crash and other Technibble forum members who have contributed to this list.

Disclaimer: You use this software at your own risk.cannot be held accountable for any damage to hardware, software, loss of data, or any other direct or indirect damage caused by using this software. Some of these CD’s contain cryptographic software which is illegal in some countries, so be sure to follow your local laws. Using any of this software is an agreement that you understand and acknowledge this.

Wednesday, September 14, 2011

How To Fix Windows Cannot Find MSCONFIG Error at RUN Command

Usually virus is the culprit for removing msconfig, regedit and etc from Run command. Anyway, here’s how I manage to bring back MSCONFIG to the Run command.


Here the steps to fix this problem

1.Download the msconfig_by_gigs.rar 
   Click here to Download http://adf.ly/2jreO

2.after you download it, Extract, see the picture where you place the msconfig.exe

In the right pane, next to Default, it should show:
C:\WINDOWS\PCHealth\HelpCtr\Binaries\MSConfig.exe


That should restore MSConfig.exe to your Windows. IF MSConfig.exe is already there and you still can’t launch MSCONFIG from Run command, then the reference to the path within the registry may be wrong. Check this location in the registry:
4.Open regedit follow this path below
HKEY_LOCAL_MACHINE\SOFTWARE\Microsoft\Windows\CurrentVersion\App Paths\MSCONFIG.EXE


Once you have both MSConfig.exe file in your computer and the registry path is set correctly, you shouldn’t have problems running msconfig command from Run.

See Other PC Laptop Repair Click here http://adf.ly/2SMhk


Windows XP Quick Fix – Repair Tool


XPQuickFix is a small, freeware and portable tool designed to quickly fix any restrictions and other errors that are often caused by viruses. XPQuickFix can correct 25 common Windows XP problems such as enable the Task Manager, enable Registry Editor, fix a CD autoplay and more.

Here is the complete list of the fixes:

Enable Task Manager
Enable Registry Editor
Stop My Documents open at startup
Enable Folder Options
Restore missing Run dialog box
Enable Command Prompt
Restore My Computer (Computer) properties
Restore Device Manager
Fix delay in opening Explorer
Restore grayed Explorer and Taskbar toolbars
Restore My Documents properties
Remove OEM splash and wallpaper
Restore My Network Places to Desktop
Enable Recovery Console
Restore grayed file associations
Fix right-click error
Fix slow network file/shared/remote
Restore Network icon to system tray
Fix slow hotkeys
Fix CD/DVD drive is missing or not recognized
Fix CD autoplay
Restore “Send To” context menu item
Restore the native ZIP file integration
Fix error 1606 couldn’t access network location
Error when trying to access Add or Remove/ Program and Features program

Download Link:

See Other PC Laptop Repair Click here http://adf.ly/2SMhk

Friday, September 9, 2011

How To Recover Your Computer After Virus Attack


Even after the virus is totally removed from the system, some users find it difficult to restore all those things back which were affected by the virus. A virus usually when enters into a system disables the registry editor and task manager so that the user can not remove the virus from the system.

Here is a free tool Re-Enable using which even a novice users can fix all the things which were disabled by the virus. An antivirus can remove the virus files but sometimes it may fail to restore the system settings. In such situations this tool can come handy.

The program has the ability to restore functionality to these Windows features:

Windows Registry
Command Line Tool
Windows Task Manager
System Restore Config
Folder Options
Run command
My Computer
Task Scheduler
Right Click Context menu
Ms-Config (Xp only)
Control Panel
Search

You will require dot net 3.5 or higher version to run this software. Or if you don’t want to download .Net framework then you can try the portable version of this software.

DownLoad Link:
http://adf.ly/2ecKJ

See Other PC Laptop Repair Click here http://adf.ly/2SMhk

Tuesday, September 6, 2011

Installing Windows XP Vista and 7 Using A USB Flash Drive


What you need:

1) An empty USB flash drive, at least 1GB to 4GB in size (Is it necessary to be empty? Yes, because the program we will use formats the USB drive before copying window files)
2) NoviCorp Wintoflash (download here)
(NOTE: As of this writing, the program is still in beta, though I have not encountered any error or problem using it, we all know that using beta softwares may cause problems or still has some bugs in it.)
3. Windows XP VISTA 7 installer CD or a copy to your hard drive.
    An unmodified, legal copy of Windows XP, Vista, 7 
    Modified copy of Windows XP, Vista, 7 

Steps on installing Windows Xp from Flash Drive:

1. Prepare your flash drive. Run WinToFlash.exe and choose the wizard.


This one is self explanatory. Windows files path would be your Windows CD and USB drive is your flash disk. Next window will be copying the setup files to yourflash drive. In took about 30 minutes in my test using a 2 GB KingMax flash drive (I believe this result may vary depending on the speed of your source and your USB drive).


2. Turn on your laptop. Enter BIOS by pressing F2. Make sure that SATA Controller Mode is set to Compatible under Configuration. If you do not do this, the windows installer will not see your hard disk upon setup. Now Save and Exit.

[serena+004+(Small).jpg]

3. Upon restart press F12 to choose Boot Device. Select your Flash Drive from the list:

[select+boot+device.jpg]

4. This window will appear. Select 1st, text mode setup (boot from flash again after finish) here. You will now see the usual setup process when you install windows from CD.

[select+operating+system+to+start.jpg]

5. When the initial copying of files is finish and the system restarts, you need to boot from flash drive again. But this time you will choose the first option in the picture above. (2nd, GUI mode setup). You will choose this option until the next 2 restarts and the first boot of windows. If you let it boot in hard disk, you will receivethe error:
[Lenovo+S10-2+Windows+XP.jpg]

Windows could not start because the following files is missing or corrupt:
\system32\hal.dll
Please re-install a copy of the above file.
If that happens, just restart your laptop and choose to boot from flash drive. Installation of windows finished after 35 minutes in my test. It may vary depending on the speed of your laptop and your USB drive.

See Other PC Laptop Repair Click here http://adf.ly/2SMhk


Sunday, September 4, 2011

64bit Checker


64bit Checker

64bit Checker is a tool that will show you what version of Windows is installed on your computer, is it 64bit or 32bit version of Windows and is your processor capable of running 64bit operating systems.

Features

shows if your computer is running a 32bit or 64bit version of Windows
detects whether your processor supports a 64bit operating systems (if you are not sure that you can install 64bit operating system on your computer)
copy report information to clipboard, or save in text or html file freeware
portable (no installation needed, no need for .net or runtime library's of any kind)

Description

64bit Checker is a small tool that will show you what version of Windows is installed on your computer, is it 64bit or 32bit version of Windows and is your processor capable of running 64bit operating systems.

It doesn't matter whether you are trying to find out if you have 64-bit Windows 7 or 64-bit Windows Vista, this utility will work on all versions of Windows since Windows 95.

The 64-bit version of Windows handles large amounts of random access memory (RAM) more effectively than a 32-bit system. To run a 64-bit version of Windows, your computer must have a 64-bit-capable processor, 64bit Checker will allow you to easily check your computers compatibility with 64bit Windows.

DownLoad Link:

See Other PC Laptop Repair Click here http://adf.ly/2SMhk

How To: Install Windows 7 Or Windows 8 From USB Drive [Detailed 100% Working Guide]

This guide works 100% for Vista & Windows 7 unlike most of the guides out there. I have seen many sites/blogs that have “Install Vista from USB guide” but either with incomplete steps or not working guide. I have also seen some guides that don’t’ use proper commands in this guide. After spending many hours I have come up with this 100% working guide.


I just did this method on one of my friends machine and installed the new Windows 7BETA. The main advantage is that by using USB drive you will be able to install Windows 7/Vista in just 15 minutes. You can also use this bootable USB drive on friend’s computer who doesn’t have a DVD optical drive.

The method is very simple and you can use without any hassles. Needless to say that your motherboard should support USB Boot feature to make use of the bootable USB drive.

Requirements:

*USB Flash Drive (Minimum 4GB)

*Windows 7 or Vista installation files.

Follow the below steps to create bootable Windows 7/Vista USB drive using which you can install Windows 7/Vista easily.

1. Plug-in your USB flash drive to USB port and move all the contents from USB drive to a safe location on your system.

2. Open Command Prompt with admin rights. Use any of the below methods to open Command Prompt with admin rights.

*Type cmd in Start menu search box and hit Ctrl+ Shift+ Enter.

Or

*Go to Start menu > All programs > Accessories, right click on Command Prompt and select Run as administrator.

3. You need to know about the USB drive a little bit. Type in the following commands in the command prompt:

First type DISKPART and hit enter to see the below message.


Next type LIST DISK command and note down the Disk number (ex: Disk 1) of your USB flash drive. In the below screenshot my Flash Drive Disk no is Disk 1.

4. Next type all the below commands one by one. Here I assume that your disk drive no is “Disk 1”.If you have Disk 2 as your USB flash drive then use Disk 2.Refer the above step to confirm it.

So below are the commands you need to type and execute one by one:

SELECT DISK 1

CLEAN

CREATE PARTITION PRIMARY

SELECT PARTITION 1

ACTIVE

FORMAT FS=NTFS

(Format process may take few seconds)

ASSIGN

EXIT

Don’t close the command prompt as we need to execute one more command at the next step. Just minimize it.

5. Next insert your Windows7/Vista DVD into the optical drive and check the drive letter of the DVD drive. In this guide I will assume that your DVD drive letter is “D” and USB drive letter is “H” (open my computer to know about it).

6. Maximize the minimized Command Prompt in the 4th step.Type the following command now:

D: CD BOOT and hit enter.Where “D” is your DVD drive letter.

CD BOOT and hit enter to see the below message.

7. Type another command given below to update the USB drive with BOOTMGR compatible code.

BOOTSECT.EXE /NT60 H:


Where “H” is your USB drive letter. Once you enter the above command you will see the below message.

8. Copy your Windows 7/Vista DVD contents to the USB flash drive.

9. Your USB drive is ready to boot and install Windows 7/Vista. Only thing you need to change the boot priority at the BIOS to USB from the HDD or CD ROM drive. I won’t explain it as it’s just the matter the changing the boot priority or enabling the USB boot option in the BIOS.

Note: If you are not able to boot after following this guide means you haven’t set the BIOS priority to USB. If you got any problem in following this guide feel free to ask questions by leaving comment.

See Other PC Laptop Repair Click here http://adf.ly/2SMhk

Tuesday, August 30, 2011

Installing Windows XP Using A USB Flash Drive


1. An unmodified, legal copy of Windows XP Home or XP Professional
2. USB memory stick (2 GB recommended - 1 GB minimum)
3. A motherboard that is capable of booting from a USB drive (check your motherboard manual if not sure)

As long as you have all three points above met, then you are ready to start. Just so you know, in this process your USB flash drive will be formatted, so do not use a USB that contains data vital to you. As for a motherboard that is capable of booting from a USB drive, most modern motherboards offer this as a standard feature. If your motherboard is less than two years old, chances are that the motherboard you have supports this feature.

Okay, now we have made sure that your computer is capable of installing XP from a USB disk. The next thing we need to do is to download and extract three tools that are going to help us in this procedure. You can find download links to these files below:

1. USB_Prep8
2. PEtoUSB
3. Bootsect

Download Link:

I suggest you download these files directly to the root of your hard drive. In other words save them to a folder on the same drive that contains your operating system — for most people this will be the C: drive. Once they are all downloaded, go ahead and extract PEtoUSB and USB_Prep8 to separate folders. Once this is done you should take the contents of the PEtoUSB folder and copy them into the USB_Prep8 folder. Once this is done, you should go back to the root of your drive and extract Bootsect to the root of the drive (program files and Windows folder is stored in this area). We do not need to worry about the Bootsect program for now, however that is simply preparation for later. And as another matter of preparation I suggest you insert your Windows XP CD, create a folder on the root of your drive, name it XP, and then copy the contents of your Windows XP CD into that folder as you will need these files soon.


Okay, now that all the preparation is out of the way, we’ll start the process. It will take on average about 20-25 minutes to complete this process depending, of course, on the speed of your PC and of the USB stick you are going to be using. I must warn you now that you should NOT close any of the windows generated by the programs I am showing you how to use until you reach the point in this guide when I tell you to do so. This is quite important because, if you happen to close any of the following windows, it is possible that you can screw up the procedure and you will have to start again. With that out of the way, as long as you follow the instructions below, everything will run smoothly.

1. Go into the folder named USB_Prep8 and double-click the following: (usb_prep8.cmd)


2. Make sure you select the newly created command prompt window and click any key to continue
3. A new program is started (PeToUSB). Do not change any of the settings; just click start and let it run


4. Once PeToUSB is finished, DO NOT CLOSE any of the windows the program created


5. Go to your start menu and click run if you’re using the classic start menu
6. Enter the following command into your run window: (CMD)]
7. Once you have run that command, a new window will appear with the words command prompt
8. Provided that you have used the file setup I suggested, input the following: ( cd \bootsect )


9. Type in the following: ( bootsect /nt52 H: ) Replace H with the drive letter of your USB drive
10. You will see the message (Bootcode was successfully updated on targeted volume) if it worked right
11. You may NOW close all the windows except for the window that was created when you ran USB_Prep8


12. Providing you closed all the right windows, the USB_Prep8 Window will now contain seven options


13. Press 1 on your keyboard — this will bring up a window. Locate your XP folder and highlight it. Click OK


14. Press 2 on your keyboard — the program will ask for a unused drive letter (example: T or Z)


15. Press 3 on your keyboard — the program will ask for your USB Stick drive letter; enter it now.


16. Press 4 on your keyboard to start the USB_Prep8 process


17. The program will ask you if it is OK to format a drive contained in the letter you gave in #14; click yes


18. The program will start to copy the needed files; be patient
19. The program will then ask you if you wish to copy these files to the USB stick; click yes.


20. Finally, once it has finished copying the files, it will ask you if you want to make the stick the preferred boot drive. Click yes, after which it will ask if you wish to un-mount the USB stick. Click yes

And that’s all there is to it. The USB flash drive is now ready to install XP to any hardware that is supported by the Windows XP CD. However there are some minor differences to installing Windows XP this way than if you would with an optical drive, which I am going to go into. Of course, as I have said before, the speed at which Windows XP installs is MUCH faster when installing using a USB stick than if you were using an optical drive (CD/DVD). But the speed comes at the price of you needing to pay a little more attention to the install itself. Now from this point on, I am going to assume that your motherboard does in fact support booting from USB and that you have gone into your BIOS and have set the USB flash drive as the first drive to be booted from (make sure the flash drive is connected before you turn power on — it helps). I cannot give a generic answer to where that option is in your BIOS; I suggest you look up in your motherboard’s documentation.

Repair and fresh install of window XP Click here http://adf.ly/2UbyY

Providing it boots from the USB flash drive, you will now be shown two options. One with the words GUI and one with the words Text Mode. Choose the Text Mode option first. Now you will see what you normally would see during a CD install of XP. Just follow the on-screen instructions as always. One note is that, if you need to create a new partition for your new Windows XP installation, once the partition is fully formatted, instantly turn off the PC as the install will need to be restarted so the flash drive can recognize the layout of your partitions correctly. Follow the instructions below:

1. Create a new partition and format it as normal
2. Once the partition is formatted, restart your PC and when the options come up again choose Text Mode
3. Highlight the newly formatted partition, press enter, move down to make no changes, and press enter

Okay, now after that all goes through and the PC restarts, simply chose the GUI option on the menu and let the Windows XP install go along as it would normally do. I must advise that you DO NOT REMOVE the USB stick until you’re actually past the setup stage. Once you have just booted into Windows XP for the first time, you can go ahead and remove the USB stick. Congratulations! You have just installed Windows XP without the need for a CD/DVD drive.

The benefits of installing from USB are plentiful and, providing you take the time to follow the instructions above, you need never worry about scratching your Windows XP CD again. I hope that the time I spent writing this guide will help you all to decrease the amount of time you spend having to install Windows XP .

See Other PC Laptop Repair Click here http://adf.ly/2SMhk

Monday, August 29, 2011

How to Create a system recovery disk in Windows 7

Windows 7 also incorporates a very interesting feature: the creation of a repair disk directly from the system.

In Control Panel, click System and Security (System and Security), and then click Backup and Restore (Backup and Restore).

In the left pane, click Create a system recovery disk (Create a system recovery disc);

Insert a blank CD in the DVD, and then click Create Disk (Create Disc).


The disc is created is a few seconds:


To check, reboot the system on the DVD player.


After loading the files, select the language, and then click Next (Next).

Windows 7 installed the system is found, click Next (Next):


The recovery tools appear:

Repair boot (Startup Repair)

System Restore to an earlier date (System Restore)


Restoring a backup image (Image Recovery System)

Memory Diagnostic Tool Windows (Windows Memory Diagnostic)

Command Prompt (Command Prompt)


It is hoped that the PC brand that does not provide the installation DVD will not bypass this feature which will repair a failing system.

See Other PC Laptop Repair Click here http://adf.ly/2SMhk